Working with Shortcuts
The Windows Script
Host enables your scripts to create and modify shortcut files. When
writing scripts for other users, you might want to take advantage of
this capability to display shortcuts for new network shares, Internet
sites, instruction files, and so on.
Creating a Shortcut
To create a shortcut, use the CreateShortcut method:
WshShell.CreateShortcut(strPathname)
| WshShell | The WshShell object. |
| strPathname | The full path and filename of the shortcut file you want to create. Use the .lnk extension for a file system (program, document, folder, and so on) shortcut; use the .url extension for an Internet shortcut. |
The following example creates and saves a shortcut on a user’s desktop:
Set WshShell = objWScript.CreateObject("WScript.Shell")
Set objShortcut = objWshShell.CreateShortcut("C:\Users\Paul\Desktop\test.lnk")
objShortcut.Save
Programming the WshShortcut Object
The CreateShortcut method returns a WshShortcut object. You can use this object to manipulate various properties and methods associated with shortcut files.
This object contains the following properties:
Arguments—
Returns or sets a string that specifies the arguments used when
launching the shortcut. For example, suppose that the shortcut’s target
is the following:
C:\Windows\Notepad.exe C:\Users\Paul\Documents\todolist.txt
In other words, this shortcut launches Notepad and loads the Boot.ini file. In this case, the Arguments property would return the following string:
C:\Users\Paul\Documents\todolist.txt
Description— Returns or sets a string description of the shortcut.
FullName— Returns the full path and filename of the shortcut’s target. This will be the same as the strPathname value used in the CreateShortcut method.
Hotkey— Returns or sets the hotkey associated with the shortcut. To set this value, use the following syntax:
WshShortcut.Hotkey = strHotKey
| WshShortcut | The WshShortcut object. |
| strHotKey | A string value of the form Modifier+Keyname, where Modifier is any combination of Alt, Ctrl, and Shift, and Keyname is one of A through Z or 0 through 12. |
For example, the following statement sets the hotkey to Ctrl+Alt+7:
objShortcut.Hotkey = "Ctrl+Alt+7"
IconLocation— Returns or sets the icon used to display the shortcut. To set this value, use the following syntax:
WshShortcut.IconLocation = strIconLocation
| WshShortcut | The WshShortcut object. |
| strIconLocation | A string value of the form Path, Index, where Path is the full pathname of the icon file and Index is the position of the icon within the file (where the first icon is 0). |
Here’s an example:
objShortcut.IconLocation = "C:\Windows\System32\Shell32.dll,21"
TargetPath— Returns or sets the path of the shortcut’s target.
WindowStyle— Returns or sets the window style used by the shortcut’s target. Use the same values outlined earlier for the Run method’s intWindowStyle argument.
WorkingDirectory— Returns or sets the path of the shortcut’s working directory.
Note
If you’re working with Internet shortcuts, bear in mind that they support only two properties: FullName and TargetPath (the URL target).
The WshShortcut object also supports two methods:
Listing 3 shows a complete example of a script that creates a shortcut.
Listing 3. Script That Creates a Shortcut File
Set objWshShell = WScript.CreateObject("WScript.Shell")
'
' Create the shortcut
'
Set objShortcut = objWshShell.CreateShortcut(strUserProfile & _
                  "\Desktop\Edit To Do List.lnk")
'
' Set some shortcut properties and then save it
'
With objShortcut
    .TargetPath = "C:\Windows\Notepad.exe"
    .Arguments = "C:\Users\Paul\Documents\todolist.txt"
    .WorkingDirectory = "C:\Users\Paul\Desktop"
    .Description = "Opens ToDoList.txt in Notepad"
    .Hotkey = "Ctrl+Alt+7"
    .IconLocation = "C:\Windows\System32\Shell32.dll,21"
    .WindowStyle = 3
    .Save
End With
|
Working with Registry Entries
You’ve
seen throughout this book that the Registry is one the most crucial
data structures in Windows. However, the Registry isn’t a tool that only
Windows yields. Most 32-bit applications make use of the Registry as a
place to store setup options, customization values the user selected,
and much more. Interestingly, your scripts can get in on the act, too.
Not only can your scripts read the current value of any Registry
setting, but they can also use the Registry as a storage area. This
enables you to keep track of user settings, recently used files, and any
other configuration data that you’d like to save between sessions. This
section shows you how to use the WshShell object to manipulate the Registry from within your scripts.
Reading Settings from the Registry
To read any value from the Registry, use the WshShell object’s RegRead method:
WshShell.RegRead(strName)
| WshShell | The WshShell object. |
| strName | The name of the Registry value or key that you want to read. If strName\), RegRead returns the default value for the key; otherwise, RegRead returns the data stored in the value. Note, too, that strName must begin with one of the following root key names: ends with a backslash ( |
| | Short Name | Long Name |
| | HKCR | HKEY_CLASSES_ROOT |
| | HKCU | HKEY_CURRENT_USER |
| | HKLM | HKEY_LOCAL_MACHINE |
| | N/A | HKEY_USERS |
| | N/A | HKEY_CURRENT_CONFIG |
The script in Listing 4 displays the name of the registered owner of this copy of Windows 7.
Listing 4. Script That Reads the RegisteredOwner Setting from the Registry
Set objWshShell = WScript.CreateObject("WScript.Shell")
strSetting = "HKLM\SOFTWARE\Microsoft\Windows NT\CurrentVersion\RegisteredOwner"
strRegisteredUser = objWshShell.RegRead(strSetting)
WScript.Echo strRegisteredUser
|
Storing Settings in the Registry
To store a setting in the Registry, use the WshShell object’s RegWrite method:
WshShell.RegWrite strName, anyValue [, strType]
| WshShell | The WshShell object. |
| strName | The name of the Registry value or key that you want to set. If strName(\), RegWrite sets the default value for the key; otherwise, RegWrite sets the data for the value. strName must begin with one of the root key names detailed in the RegRead method. ends with a backslash |
| anyValue | The value to be stored. |
| strType | The data type of the value, which must be one of the following: REG_SZREG_EXPAND_SZ, REG_DWORD, or REG_BINARY. (the default), |
The following statements create a new key named ScriptSettings in the HKEY_CURRENT_USER root:
Set objWshShell = WScript.CreateObject("WScript.Shell")
objWshShell.RegWrite "HKCU\ScriptSettings\", ""
The following statements create a new value named NumberOfReboots in the HKEY_CURRENT_USER\ScriptSettings key, and set this value to 1:
Set objWshShell = WScript.CreateObject("WScript.Shell")
objWshShell.RegWrite "HKCU\ScriptSettings\NumberOfReboots", 1, "REG_DWORD"
Deleting Settings from the Registry
If you no longer need to track a particular key or value setting, use the RegDelete method to remove the setting from the Registry:
WshShell.RegDelete(strName)
| WshShell | The WshShell object. |
| strName | The name of the Registry value or key that you want to delete. If strName ends with a backslash (\),
RegDelete, deletes the key; otherwise, RegDelete deletes the value. strName must begin with one of the root key names detailed in the RegRead method. |
To delete the NumberOfReboots value used in the previous example, you would use the following statements:
Set objWshShell = WScript.CreateObject("WScript.Shell")
objWshShell.RegDelete "HKCU\ScriptSettings\NumberOfReboots"
Working with Environment Variables
Windows 7 keeps track of a number of environment variables
that hold data such as the location of the Windows folder, the location
of the temporary files folder, the command path, the primary drive, and
much more. Why would you need such data? One example would be for
accessing files or folders within the main Windows folder. Rather than
guessing that this folder is C:\Windows, it is much easier to just query the %SystemRoot%
environment variable. Similarly, if you have a script that accesses
files in a user’s My Documents folder, hard-coding the username in the
file path is inconvenient because it means creating custom scripts for
every possible user. Instead, it is much easier to create just a single
script that references the %UserProfile% environment variable. This section shows you how to read environment variable data within your scripts.
The defined environment variables are stored in the Environment collection, which is a property of the WshShell object. Windows 7 environment variables are stored in the "Process" environment, so you reference this collection as follows:
WshShell.Environment("Process")
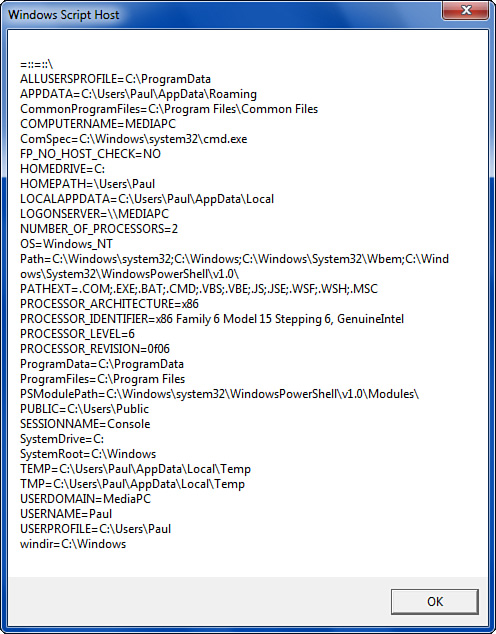
Listing 5 shows a script that runs through this collection, adds each variable to a string, and then displays the string.
Listing 5. Script That Displays the System’s Environment Variables
Set objWshShell = WScript.CreateObject("WScript.Shell")
'
' Run through the environment variables
'
strVariables = ""
For Each objEnvVar In objWshShell.Environment("Process")
    strVariables = strVariables & objEnvVar & Chr(13)
Next
WScript.Echo strVariables
|
Figure 3 shows the dialog box that appears. (Your mileage may vary.)
If you want to use the value of a particular environment variable, use the following syntax:
WshShell.Environment("Process")("strName")
| WshShell | The WshShell object |
| strName | The name of the environment variable |
Listing 6 shows a revised version of the script from Listing 3 to create a shortcut. In this version, the Environment collection is used to return the value of the %UserProfile% variable, which is used to contrast the path to the current user’s Desktop folder.
Listing 6. Script That Creates a Shortcut File Using Environment Variables
Set objWshShell = WScript.CreateObject("WScript.Shell")
'
' Get the %UserProfile% and %SystemRoot% environment variables
'
strUserProfile = objWshShell.Environment("Process")("UserProfile")
strSystemRoot = objWshShell.Environment("Process")("SystemRoot")
'
' Create the shortcut
'
Set objShortcut = objWshShell.CreateShortcut(strUserProfile & _
                  "\Desktop\Edit To Do List.lnk")
'
' Set some shortcut properties and then save it
'
With objShortcut
    .TargetPath = strSystemRoot & "\Notepad.exe"
    .Arguments = strUserProfile & "\Documents\todolist.txt"
    .WorkingDirectory = strUserProfile & "\Desktop"
    .Description = "Opens ToDoList.txt in Notepad"
    .Hotkey = "Ctrl+Alt+7"
    .IconLocation = strSystemRoot & "\System32\Shell32.dll,21"
    .WindowStyle = 3
    .Save
End With